Let’s Talk Tech
Padlet Power
by Alina Celeste
Keeping up with the myriad social media and technological breakthroughs, innovations, and inventions can be an overwhelming and seemingly pointless task. There are often so many different ways to do things that learning something new, even if it would improve your life or work, seems too time consuming and complicated. Padlet, however, is worth it. Member and PIO! Editor Brigid Finucane first turned me on to the world of Padlet, and I have used it often since.
Padlet is essentially an online bulletin board, but unlike a real-life one, you can take it anywhere and no paper is necessary. Padlet inhabits a unique space between Pinterest and Google Docs; it’s surprisingly easy to use and is creative, fun, and endlessly useful. There is a learning curve, but it can be greatly lessened by diving into the many tutorials and blog posts devoted to the site or by using their own help guides.
 https://padlet.com/captain3/AlinaCeleste
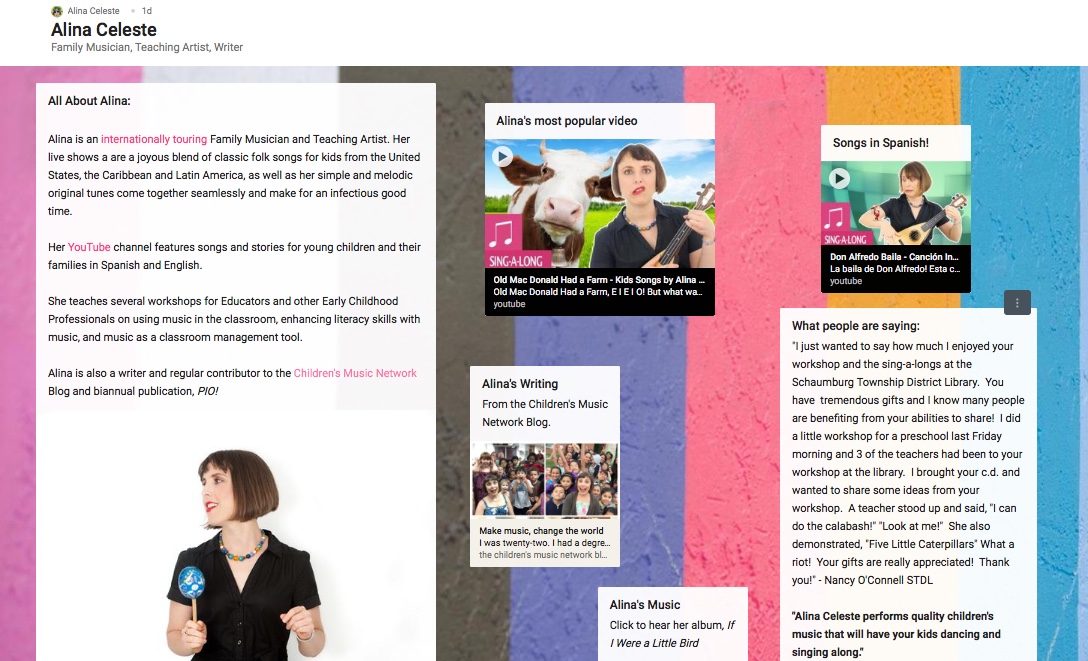
Teachers will find that Padlet is an easy platform for communication with administrators, faculty, and families at their sites. Performers will appreciate that Padlet supports photos, videos, documents, and MP3s, and may be individually customized without dependence on a webmaster to load content. Take a look at the press kit I made using this platform, then explore Brigid’s classroom Padlets at the end of this column.
With help from Brigid, I have created a step-by-step instructional guide (below). Padlets may be created on Apple or PC systems and have accompanying IOS or Android apps.
To get started:
- Create a free account. Sign up via e-mail, Google, or Facebook.
- Visit the “Getting Started” page, then go on a “Padlet Tour.” It is time well spent.
- Start your Padlet! Select the hot pink “+ New” in the menu bar or “Make a Padlet.” Either hot pink button will start the process.
- Select a Padlet format from “wall,” “canvas,” “stream,” or “grid.” I prefer “canvas,” as it allows each entry to be variably sized and placed without constraints on the Padlet surface. The other formats are helpful depending on your intended audience. For example, if you are writing for a population that primarily uses cellphones, “stream” (one continuous column), or “grid” (two or more columns) is a better choice than canvas. Luckily, formats can also be changed at any time using the three dots “...” next to the settings button.
- While this is optional, I find it’s useful to name my Padlet and add a description right away, even if it’s just “Ideas for End of the Year Concert.”
- Choose a “wallpaper” or background. The free version has many nice options and you can change your mind at any time.
Now it’s time to add the content:
- Click on the hot pink “+” button, which directs the creator to “Double click anywhere, drag files in, or click here to post.” A box opens with the descriptors “Title” and “Write something.” By default, titles are in bold, while any text written in the box is not. Highlight text to open options, e.g., bold, italic, strikethrough, link, etc.
- Add documents, photos, recordings, webcam photo, or YouTube by clicking on any of the five little icons at the bottom of the box. They all activate the same “Add an attachment” slide-out window. Paste a link or use the “Choose a file” function. A “Looks good?” query box pops open after content has been loaded. Click the “Ok ” button, and it will be transferred into the info box.
- Each box may be easily edited or discarded by clicking on it and selecting one of three icons that appears on the top. The pen allows you to edit, the garbage can deletes, and the three little dots open additional options.
- To move a box, click anywhere on the body of the box and drag it to its new home. To resize, click on right side and minimize or maximize the box. Not all formats allow resizing.
- Padlet viewing areas may be extended far beyond the screen viewing area by creating a text box to the side or the bottom and adding content. Phone viewing may be difficult, however, for Padlets that are extremely wide.
- Padlet content can be easily copied into a new Padlet and customized for another purpose.
Now that you’ve got all your content on there and you are satisfied with how it looks, it’s time to share it:
- Press the “next” button. A “People & Privacy” slide-out menu appears. Choose “Private,” “Password protected,” “secret,” or “public.” Hover your cursor over the icons to find out about each option. “Secret” allows anyone who has the link or QR code to access the Padlet. Public would make it searchable in the wider Web.
- Under the privacy icons, designate whether the Padlet is read only (“Can read”) or if collaborators can add or edit content (“Can write”). There are three levels of collaboration. If you are sharing something with a classroom of parents, “Can read” is probably the best. If you are collaborating with fellow educators or artists, “Can write” is a wonderful way to share and store information.
- When finished, click “Share” in the top menu bar. Select “Share/Export/Embed” (next to “People & Privacy”). The “Share” dropdown menu offers various means to share or export the Padlet. The “Save as PDF” function is especially fun to experiment with, as it “publishes” the Padlet in a snazzy journal format.
- The link generated during the “Share” process remains stable, even if content is changed on the Padlet.
While Padlets are free, there are three “premium” levels. The individual plan (Jetpack) costs $35 per year and adds additional wallpapers, themes, increased stability for smartphone and tablet viewing, and website hosting. Its analytics also track how many views and visitors Padlets receive. There are also school (Backpack) and business (Briefcase) plans. Please be assured, however, that the free version is satisfying and delightful.
One final note: It is currently easier to create a Padlet on a computer than on a tablet, though it can be done. Go forth and Padlet!
Here are links to example Padlets. Thanks to Brigid Finucane for sharing!
Ask Me About Music at Wildwood – Kindergarten
Ask Me About Music at Wildwood – First and Second Grade
Ask Me About Music at Wildwood – Fifth Grade