
Music With Older Kids
Teaching Fourth and Fifth Grade Music
by Valerie Leonhart Smalkin
The first principle of teaching any kind of music is listening. And may I recommend at the outset W. A. Mathieu’s The Listening Book: Discovering Your Own Music. Seriously, if that is the only thing you take away from this article, it is sufficient. Mathieu has so many brilliant things to say, particularly to those who think they cannot sing.
If you care to keep reading, I plan to offer some very practical tips for teaching fourth and fifth grade students. They’re probably so practical that you already know them, but just in case you don’t…dive in, please!
Planning, Planning, Planning
In teaching, as you surely know, or have discovered the hard way, planning is everything, even if you don’t stick to the plan. It is your insurance against chaos. And here is what every good teaching plan should have:
I. Welcoming Activities
Your welcoming activity may be a song, ritual, or activity, but using the same activity every class helps the children make the transition from whatever they were doing—gym, recess, math, etc.—to your space and time. When I was teaching middle school, I asked the students to get their textbooks or instruments from the shelves before they took their seats. Then as each one passed me I would sing, “Hello! How are you?” Each student tried to sing back, “Hello! I am _________.” As the year progressed they would fill in their answer with some very helpful information. Never hurts to know when a student is feeling poorly or terrific!

At the beginning of the academic year I would use this activity to help me learn the students’ names and assess their ability to match pitches.

II. Warm-Ups
I always find it amazing that many experienced choir directors and teachers forget warm-ups, myself included! Warm-ups are ESSENTIAL. Not just vocal warm-ups, but those for physical and breath control as well. Here are a few of my favorites to use at the beginning of the academic year. You do not need to do them all. Mix them up!
Physical Warm-ups
- Slow rolls: Slow shoulder rolls forward and backward. Head rolls, right and left, chin down (not back—that can hurt the neck). Shoulders up and down.
- Tense and relax: Shoulders, hands, knees, toes, faces. Remind students that relaxed muscles are needed for beautiful tones whether vocal or instrumental.
- Posture: Lie on floor. Lift knees, feet on floor, and feel your straight spine. Stand up—try to keep your spine as straight as it was on the floor. Pretend you are hanging by a ribbon attached to the crown of your head.
- Face: Make a happy face, sad face, angry face, and surprised face. The surprised face is the singer’s face!
- Sit and relax.
Breath Control Warm-ups
- Panting: Bend over. Place your palms on your ribcage your with your thumbs in front and your fingers toward your back. Pant and feel your ribcage move—that’s how a singer breathes.
- Deep Sips: Pretend you have a straw in your mouth and take a deep, long sip of air. Blow the air out slowly through pursed lips or while making an “s” sound.
- Diaphragm: Put your hand on your abdomen. Blow out all your air. Relax and feel your abdomen move as the air comes back in without your even trying to breathe.
Vocal Warm-ups
- Siren: Explore making a siren sound by starting low then going higher. Continue going up and down on a variety of vowels sounds, e.g., ay, ee, ah, oh, and oo. Add a consonant before the vowel sounds, e.g., nay, nee, nah, no, noo, etc.
- High/Low: Make animal sounds switching from low to high register on each syllable, e.g., hee-haw, coo-coo, yip-yip, me-ow.
- Fun Song: Sing “Apples and Bananas” with different vowel sounds or try the following song:
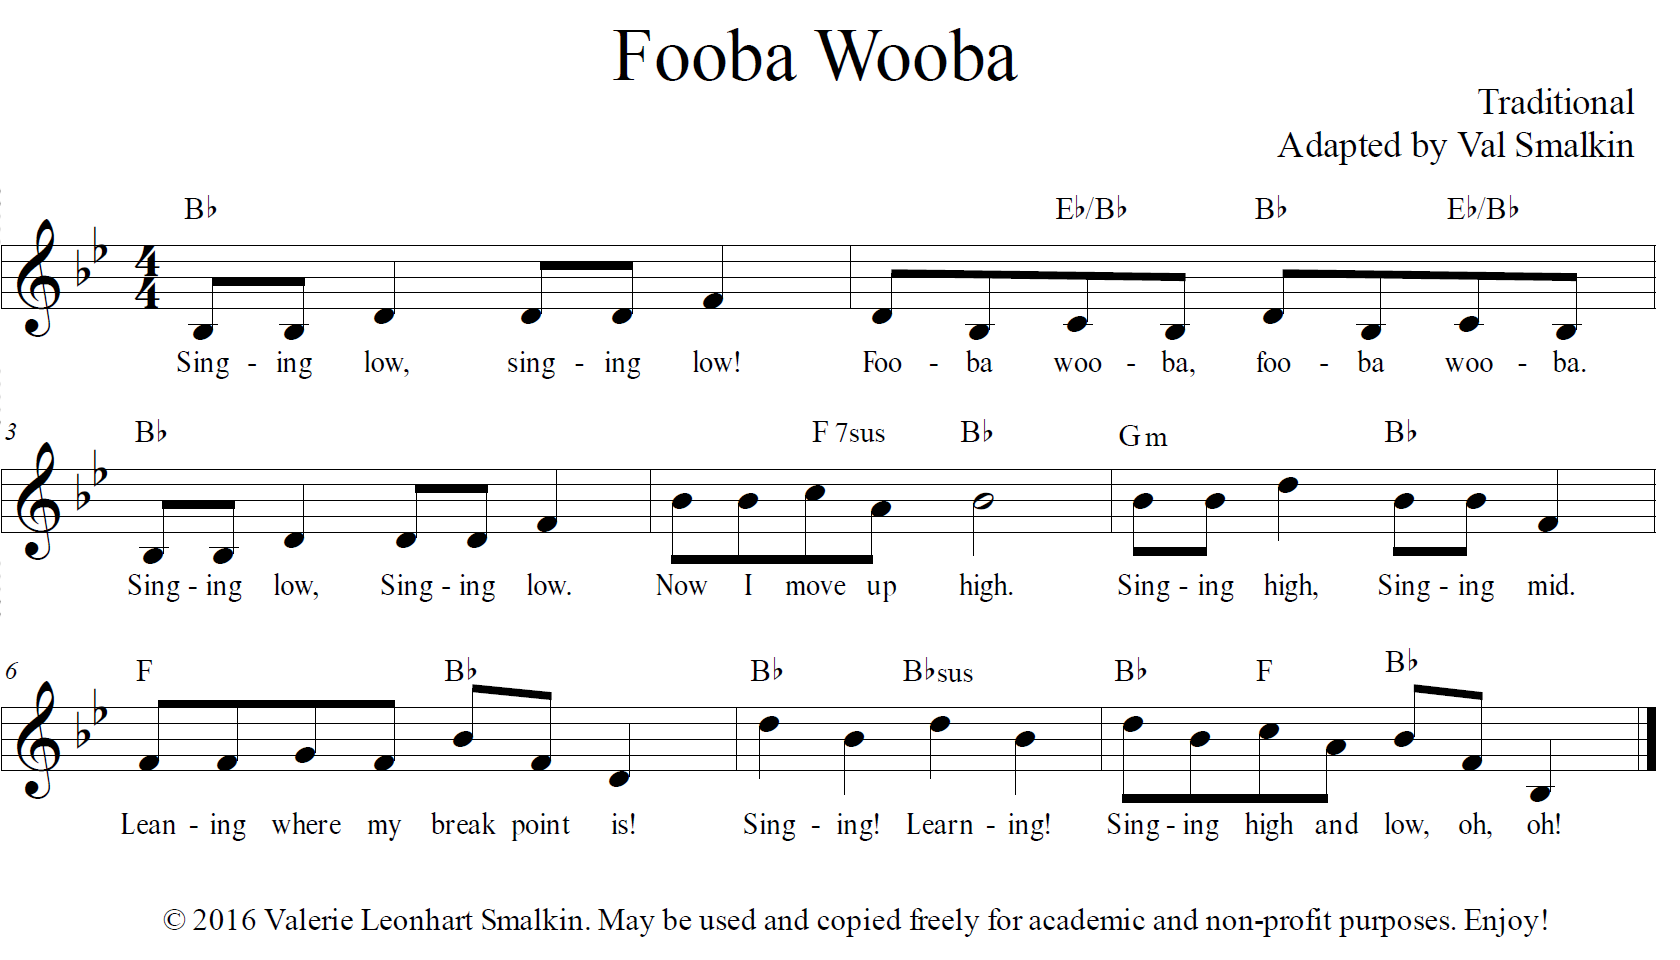
This version of “Fooba Wooba” takes me off on a slight detour on the subject of finding your head voice. My absolutely all-time favorite exercise is to have the students place their fingers (palm side toward their bodies) lightly on the front of their necks. Then I have them say my name in a low voice and repeat it in a funny, mousey voice, even asking them to make fun of me as they do it. Quite a bit of hilarity is sure to follow, but once you have them going from low to high in quick succession stop and ask them what they feel under their fingers. Some will not get it right away, but most will say that they felt their throat going in and out, or up and down. Then you can explain that is their Adam’s apple moving from their talking voice position (down) to their singing position (up). This is always a fun discovery for students, and even when they have done it many times before, they are game to do it again.
Now to get back on track:
III. The Heart of the Lesson
I’ll not say much here, because only you know what song, anthem, or instrumental piece you have to teach. But I will delve into techniques for teaching lyrics, melodies, and rhythms in future articles.
IV. Closing
Just like the opening exercise, a ritual or consistent ending is extremely useful. Save five minutes for putting books and instruments away, review what has been learned, take care of business, and send your students on their way with a smile! Maybe include a farewell song. Do you have one to share? Send it to me at Val@SillyGooseAndVal.com!